
A stud finder is a handheld device used to locate framing studs behind drywall, making it an essential tool for DIY projects like hanging shelves, mounting TVs, or securing heavy artwork. Studs are the vertical wooden or metal beams that form the framework of your walls, typically spaced 16 or 24 inches apart on center. Anchoring into a stud ensures a sturdy and safe installation, preventing damage to your walls or items. This guide will walk you through the types of stud finders, step-by-step instructions for use, safety tips, and best practices to make your DIY projects seamless and secure.
- 1 Types of Stud Finders
- 2 How to Use a Stud Finder: Step-by-Step Guide
- 3 Safety Tips for Using a Stud Finder
- 4 Comparison of Stud Finder Types
- 5 Best Practices for Accurate Stud Detection
- 6 Alternative Methods to Find Studs Without a Stud Finder
- 7 Best Stud Finders for DIY Projects
- 8 Frequently Asked Questions (FAQs)
- 9 Conclusion
Types of Stud Finders
Magnetic Stud Finders
Magnetic stud finders use strong internal magnets to detect the screws or nails used to fasten drywall to studs. As you move the magnetic stud finder along the wall, it alerts you when it encounters these metal fasteners, indicating the presence of a stud. They are simple to use and require no batteries. These are great for everyday DIY-type work. Magnetic stud finders work to a depth of about ? inch, which is sufficient most of the time for finding studs in walls behind standard ?-inch or ?-inch drywall. When locating a nail or screw, the likelihood is that there’s also a stud. Because drywall fasteners are located typically 12 to 16 inches apart, it’s recommended that users move a magnet-based stud finder over the wall in a sweeping “S” motion to more quickly detect one.
Electronic Stud Finders
Electronic stud finders are more sophisticated. They use advanced technology, such as sensors and capacitors, to detect changes in wall density. As you scan the wall’s surface with an electronic stud finder, it measures these density fluctuations caused by studs and notifies you with an audible signal or visual indicator. They often come with additional features like deep scanning modes for enhanced accuracy and are commonly preferred by professionals and avid DIY enthusiasts. Electronic stud finders can also locate a stud by using a magnet to identify screws or nails in the stud. Others use an electrical current to measure the electrostatic field within the wall. Some can also scan for electrical wires that are secured to the stud.
Radar-Based Stud Finders
One of the more modern and high-tech stud finders available today uses radar technology to find studs, pipes, wires, or even rebar in concrete. Since this device can be used to find more than just studs and is often more accurate than magnetic or electric ones, they are more expensive. These stud finders were invented by Thomas McEwan and patented in 1995, based on micropower impulse radar as the underlying technology.
How to Use a Stud Finder: Step-by-Step Guide
Using a stud finder may seem like an art to master, but with the right technique and a little practice, you’ll be a stud-finding pro in no time. Here’s a comprehensive guide on how to use a stud finder effectively:
- Check Your Stud Finder: Before you begin, make sure your stud finder is in good working condition. Check the battery levels if it’s an electronic model and ensure it’s calibrated according to the manufacturer’s instructions. If you have an electronic stud finder with multiple scanning modes, select the appropriate one based on your specific task.
- Identify the Fixing Area: Briefly check the area for sockets or light switches where cables may be running horizontally or vertically. If any fall within the area you are looking to fix in, it may be an idea to look for an alternate location.
- Calibrate the Stud Finder: Turn it on, usually with buttons mounted on the sides where you grip the tool. Now press the button to calibrate the stud finder; when the tool stops flashing or beeping, then it’s ready to go. Check your manual for exactly how your stud finder is calibrated, as it varies.
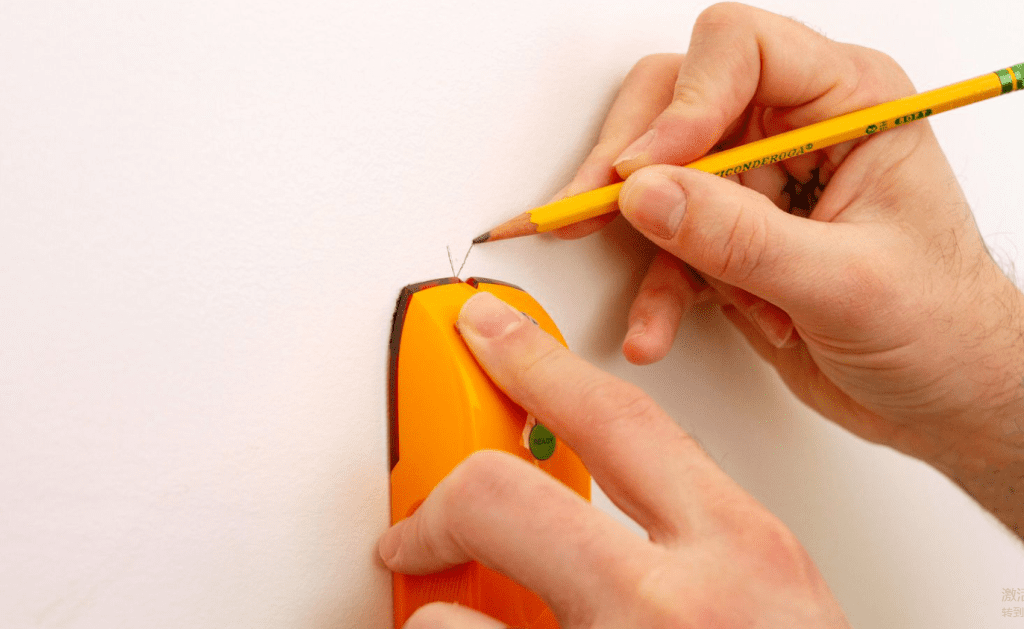
- Scan the Wall: Take your stud finder and position it to the far left border of your proposed installation area. Slowly slide the stud finder to the right, horizontally, while keeping the unit flat on the wall. When the stud finder alerts you to a stud¡ªvia a beep or flashing light, depending on the device¡ªmove the finder backwards and forwards over the last few inches you covered to find the exact spot that triggers the alert. That is the edge of the stud.
- Mark the Stud: Mark the correct spot with your pencil. If you’re using a center-finding stud finder, you’ll be shown where the edges of the studs are. Mark each edge so that, when you go to drill or hammer into the stud, you’ll know where dead center is. It’s worth noting that not every nail you find will be dead center. In some homes, walls can bow a little. In order to find the edges of the stud, slowly move the finder left and right and mark the edges.
- Verify Stud Locations: Keep moving horizontally along the wall until you’ve located all of the studs necessary for your project. Check to ensure that all marks are actually studs by measuring the distance between each mark. Studs are typically placed 16 inches on center, meaning there is a 14-1/2-inch gap between each stud’s edge. If you have a closer measurement, this could mean you’ve found a pipe or other component.
- Proceed with Your Project: Once you’ve located your studs, you are ready to complete your project, whether you’re hanging artwork or mounting a flat-screen TV. Always use the right bolts or screws when hanging your project. A weak mounting attachment can still pull away from the wall if you’ve used the wrong equipment.
Safety Tips for Using a Stud Finder
- Check for Electrical Wires: Some stud finders come equipped with features for detecting AC wires and cables. Before proceeding with your DIY project, use this feature to locate any electrical wiring hidden behind the walls. This helps prevent accidental drilling or nailing into live wires, ensuring safety during installation. Electrical wires usually run vertically on the side of a stud and sometimes horizontally between outlets.
- Avoid Plumbing Pipes: In addition to electrical wires, it’s essential to be aware of the location of water pipes, especially when working on plumbing-related tasks or installations. While stud finders primarily detect studs, some models may have features or modes that can help identify the presence of metal pipes behind the walls. Use this feature to avoid damaging water pipes and causing leaks or other plumbing issues during your DIY project.
- Don’t Touch the Wall: Don’t touch the wall with either hand while using a stud finder¡ªthis can alter its readings. Some stud finders need to calibrate before scanning, so start away from switches, outlets, or light fixtures.
- Use Painter’s Tape: To avoid marking directly on the wall, place painter’s tape over the area you want to scan. It’ll give you a surface on which to mark your findings without having to write on the wall.
Comparison of Stud Finder Types
| Type | Technology | Pros | Cons | Best For |
|---|---|---|---|---|
| Magnetic | Detects metal fasteners using magnets | Inexpensive, no batteries needed, simple to use | Limited depth (? inch), may miss studs if fasteners are absent | Basic DIY projects, occasional use |
| Electronic | Detects density changes using sensors | Accurate, can detect wires/pipes, multiple modes | Requires batteries, needs calibration | Frequent DIYers, professionals |
| Radar-Based | Uses radar to detect various materials | Highly accurate, detects studs/pipes/wires, deep scanning | Expensive, complex to use | Advanced projects, contractors |
Best Practices for Accurate Stud Detection
- Test on a Known Stud: A stud finder is one of the best tools to use when checking a wall for a solid fixing point. Whether you have a basic magnetic version or a fully featured electronic version, as long as you take your time to learn how your finder works and test it on an area where you know metal objects exist, you will be sure to be locating all manner of objects in your walls in no time.
- Scan Slowly: Using this type of stud finder requires a slow, steady approach. The most accurate electronic stud finder we tested scans the wall in 13 places to display the entire width of a stud, and unlike the competition, it does not require a fussy calibration process.
- Double-Check Measurements: Before you hang your item(s), make sure you find the studs on a wider piece of wall. They’re typically 16-24 inches apart, and verifying the studs that exist to the left and right of your project, you can make sure you haven’t accidentally found another piece of metal in the wall. Some walls will have metal flashing, brackets, or piping on the inside.
- Consider Wall Material
: It can be difficult for stud finders to locate studs behind alternative wall materials like plywood or plaster. Electronic stud finders can often detect a stud through ceramic tiles, especially if the tool comes with deep mode.
Alternative Methods to Find Studs Without a Stud Finder
If you don’t have a stud finder, you can still locate studs using these practical methods:
- The Knock Test: One way to find a stud without a stud finder tool is to knock or tap the area with a hammer or screwdriver handle. Knock gently, so you don’t damage your drywall. Make sure the room is quiet so you can hear if your tapping makes a hollow sound. A hollow sound indicates there is no stud present, so continue to gently tap to the left and right until you locate the stud. When the sound becomes muffled, you’ve found a stud. To confirm, make a fist and hit the wall with the palm side of your hand. If it feels solid, that’s your stud.
- Use a Magnet: This method may seem a bit unorthodox, but it works! Use tape or dental floss with a magnet attached and drag it across the wall to find the stud. This method works because the metal screws used to secure the drywall are typically secured to a stud. Wait until the magnet sticks to the wall and mark the location of the stud¡ªit’s that easy.
- Measure from the Corner: Since studs are generally 16¡å apart from center to center, learning how to find wall studs is pretty easy using measurements that start in the corner of the room. Keep in mind that all rooms aren’t built with studs that are 16¡å on center, so there is a chance you’ll find a stud less than 16¡å from one corner. Use the “knock test” near the corner to determine where the shorter stud spacing might be and to confirm the location of other studs.
- Look for Dimples: Drywall is fastened to studs using drywall screws or cupped drywall nails. These screws are driven just past the surface of the drywall, then covered in drywall mud and paint. This makes finding them with a magnet fairly easy. Sometimes, the drywall mud spread over fasteners during construction is sucked into the head of the fastener as it dries. If left this way before painting, a small dimple will be visible. These dimples are key indicators of a stud, and if you can locate the dimples in the wall, you’ve found what you’re looking for.
Best Stud Finders for DIY Projects
Here are some top-rated stud finders recommended for DIY enthusiasts, available on Amazon:
- Franklin Sensors ProSensor 710: This electronic stud finder is praised for its accuracy and ease of use, requiring no calibration. It features nine sensors to detect wood and metal studs behind most common wall materials. Shop on Amazon
- C.H. Hanson 03040 Magnetic Stud Finder: A reliable and affordable magnetic stud finder with two magnets for faster scanning. It’s durable and ideal for occasional DIY projects. Shop on Amazon
- Zircon MetalliScanner M40: Best for detecting metal studs and pipes, this electronic stud finder is perfect for projects requiring precise metal detection. Shop on Amazon
Frequently Asked Questions (FAQs)
Can a stud finder detect pipes or wires?
Yes, many electronic and radar-based stud finders have modes to detect pipes and live wires. Always use these features to avoid drilling into plumbing or electrical components.
How do I know if I’ve found a stud or something else?
Measure the distance between marks. Studs are typically 16 or 24 inches apart on center. If the distance is irregular, you may have detected a pipe or bracket. Double-check with a slow scan.
Do stud finders work on plaster walls?
Magnetic stud finders may struggle with thick plaster, but electronic stud finders with deep scan modes, like the Franklin ProSensor, can often detect studs through plaster or ceramic tiles.
Can I use my smartphone as a stud finder?
Yes, some smartphone apps use the device’s magnetometer to detect metal fasteners, similar to a magnetic stud finder. However, they are less accurate than dedicated tools.
How often should I calibrate my stud finder?
Calibrate your electronic stud finder before each use, as per the manufacturer’s instructions, to ensure accurate readings. Magnetic stud finders do not require calibration.
Conclusion
Mastering the use of a stud finder is a game-changer for DIY projects, ensuring your installations are secure and your walls remain intact. By understanding the types of stud finders, following a step-by-step process, and adhering to safety practices, you can confidently tackle projects like mounting TVs, hanging shelves, or decorating your home. Whether you choose a magnetic, electronic, or radar-based stud finder, the right tool and technique will make your DIY endeavors both efficient and successful. For more DIY tips, check out resources like Bob Vila or Family Handyman.